DIY Key-chain - Tutorial
So, as you may or may not know, I have an obsession with DIY. There's something about having that feeling that you made it yourself - and it feels good. Anyway, I was bored, and I wanted a key-chain (it was on my wish-list). So, I decided to surf the internet for do-it-yourself key-chains. Most of them just weren't up to what I wanted, and for some, I didn't have the materials. I plan to make another one that I found on the internet later; it was a secret lip-balm macaroon key-chain and I think that is adorable. But I don't have any lip-balm at the moment, so I combined many different ideas on the internet and made my own original key-chain!
~DIY Key-Chain~
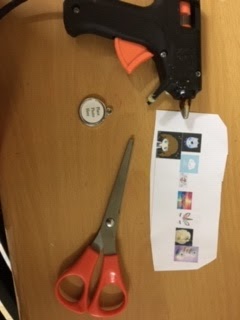
Your materials:
💌Hot glue gun
💌Clear hot glue stick
💌One of those metal orb pendants (I think that's what they're called?)
💌Scissors
💌Jump ring/ key-ring
💌A sheet of paper printed with some of your favorite pictures off the internet
When you've got your materials, first you begin with cutting some of your pictures and putting them on your orb pendant to check them out.

You might want to trace the size of the pendant with a pencil and scrap paper like I've done here.


I decided that the unicorn looked best; so I decided to make a unicorn pendant! First, I stuck the picture on the pendant, and then I covered it with hot glue. Then I stuck the pendant face-down on a smooth, flat surface, like my table.

The pendant drying. Remember, you need a smooth surface so it can peel off easily. Don't worry, it won't leave any marks.

What it looked like after drying; I KNOW I KNOW IT LOOKS MESSY

After I trimmed it with scissors. It looks better? 🤷

I decided that since the edges looked so messy, I might as well cover them up. So I tried gem stickers which is completely optional; you can use other things like ribbon too if your sides look just as messy.

I added a gem to the back as well for 'effect'. Actually it just looks cute, and that's it. XD

My jump ring. I didn't have a key-ring, so...well...improvise!

What it looks like, hanging on my bag. Well, for that string I took a rubber band, cut it, and then tied it to the pendant to secure it to the jump ring and I secured it with hot glue.
Overall, I'm quite pleased with how it's turned out! I might do more DIY tutorials later on, and I hope you will make this!
Cya! 😅
#keychains #DIY #doityourself #prettyupyourbag #blog #blogging #bloggingadventures
~DIY Key-Chain~
Your materials:
💌Hot glue gun
💌Clear hot glue stick
💌One of those metal orb pendants (I think that's what they're called?)
💌Scissors
💌Jump ring/ key-ring
💌A sheet of paper printed with some of your favorite pictures off the internet
When you've got your materials, first you begin with cutting some of your pictures and putting them on your orb pendant to check them out.
You might want to trace the size of the pendant with a pencil and scrap paper like I've done here.
I decided that the unicorn looked best; so I decided to make a unicorn pendant! First, I stuck the picture on the pendant, and then I covered it with hot glue. Then I stuck the pendant face-down on a smooth, flat surface, like my table.
The pendant drying. Remember, you need a smooth surface so it can peel off easily. Don't worry, it won't leave any marks.
What it looked like after drying; I KNOW I KNOW IT LOOKS MESSY
After I trimmed it with scissors. It looks better? 🤷
I decided that since the edges looked so messy, I might as well cover them up. So I tried gem stickers which is completely optional; you can use other things like ribbon too if your sides look just as messy.
I added a gem to the back as well for 'effect'. Actually it just looks cute, and that's it. XD
My jump ring. I didn't have a key-ring, so...well...improvise!
What it looks like, hanging on my bag. Well, for that string I took a rubber band, cut it, and then tied it to the pendant to secure it to the jump ring and I secured it with hot glue.
Overall, I'm quite pleased with how it's turned out! I might do more DIY tutorials later on, and I hope you will make this!
Cya! 😅
#keychains #DIY #doityourself #prettyupyourbag #blog #blogging #bloggingadventures


Comments
Post a Comment
if you're going to comment, do! I love comments! make sure it isn't anything rude please <3