Posts

Showing posts with the label Tutorials

how to create a story character: a guide by subhana

Hello! Today I will be showing you how to create a character for your story. I have created a lot for my stories and they are actually very easy to make! Choose your character's gender, name and age. And all this should tie in with the story. If there is a certain age limit for doing certain important things your character must do (eg. time travel, supernatural abilities, etc etc) and if they have an important name that is supposed to drive the plot, then do so. Remember - don't let a character have a very unusual name for their time/place unless it drives the plot and the age limit mustn't be unrealistic (you can't make characters climb mountains and shoot guns when they're like, seven). Give your character a personality. For the sake of this post, I shall choose my character Vivian Wren as an example. The character must have strengths (eg. Vivian's good at combat, deception and is loyal) but weaknesses, too (not quick to trust anyone, very judgemental, pessimi...

Writing tipz

Heyy! I have some writing tips for you today; I am not a professional or perfect writer, these are just some guidelines that help me write stuff. [ proceed? ] [ yes  ]  [ no ] tip #1 Use the settings and genres you feel most comfortable writing. If you can't write horror, don't push yourself to. If you find it hard to write about nighttime or the mountains, do something else. In the long run, you should practise writing all sorts of genres, but I find it easier to write about coldness/nighttime, which is why a lot of my stories are mainly set at night. tip #2 Provide details. Details about a person, clothing, setting, view, all draw in the reader. For example, the sentence, "I looked at the mountains" is straight and clear, but if you said "I stared at the mountains, their edges glowing in the setting sun" would work better. Also something like "Her silver dress was beautiful" could be turned into "She was wearing a silver dress,...

Quick'n easy recipes!

Hello! After such a long time, I'm posting recipes again! These are easy and quick recipes that work easily, and are perfect for the upcoming summer! I've tried these and they work amazing, so no doubts going on over here that they won't! ~chicken mayo sandwiches~ Ingredients: Plain cooked chicken Mayonnaise Salt and pepper to taste A teaspoon of heavy cream Bread (toasted) Method: Mix everything except bread in a large bowl. Spread on the bread and serve. ~shrimp mushroom pasta~ Ingredients: Pasta - cooked Shrimps - cooked Bechamel sauce Mushrooms - cooked A lemon Mix the pasta, bechamel sauce, and mushrooms in a bowl. Squeeze a lot of lemon juice in another bowl. Throw the cooked shrimps in it. Secure a lid over the bowl and toss it around for about a minute. Leave the shrimps in the lemon for about half an hour, and then mix them in with the pasta! Serve warm! ~cream strawberry biscuit~ Ingredients: Icing Biscuits Fresh strawberries Ic...

DIY Pearl bobby pins - Tutorial

So here we are with another DIY post! I absolutely love sharing all my DIY ideas. It's so fun! Anyways, today I'm doing pearl bobby pins. These are so easy, and so cute! I'm thinking of making animal bobby pins later, so let me know what you think in the comments! These pearl bobby pins are perfect for the weekend, as they add a touch of sparkle to a fancy outfit. Don't worry, you don't really need to only use pearl beads. You could use any other sparkly things, but I just think that pearls are simple and make more of a statement. This doesn't have pictures yet, but I will try to add them soon. Materials: 🍧Hot glue gun 🍧Bobby pins 🍧Pearl beads 🍧Hot glue stick So, first you'll have to heat your hot glue gun up. When it's ready to go, squirt a small  blob on the head of the bobby pin. Make sure the bobby pin is vertical, with the head up. If you do it horizontally, the glue will start dripping everywhere. Now put the pearl on. You have to be ...

DIY Charm - Tutorial

Image
Here's another DIY tutorial on a DIY charm! These charms are super cute and have so many possibilities! This is a super easy craft which doesn't require any special materials, doesn't require major expertise, and can easily be made by a 9-year-old! This easy simple double-sided heart charm that I made today set me rocking for fifteen minutes. I have it right beside me. (Just one more chicken nugget on the information platter). You will need: 💟A hot glue gun 💟A clear glue stick 💟Any coloring supplies; I used permanent markers but you don't have to 💟Paper (lots) 💟Scissors 💟A pencil/pen       breathe and believe in hot glue magic Okay, so, now what? Fold the paper in half and draw a shape (I chose a heart because it's simple) on it, like this: That's what it should look like. Cut it out. You should have two exact shapes. Now, get coloring! I used blue for one and pink for another, but you can make them both the same and choose ...

DIY Lip Balm - Tutorial

Aaaaand I'm back with another DIY post...this one doesn't have pictures but it is pretty straightforward. This is DIY lip balm and it is soooooo  easy! It literally requires two ingredients for the lip balm itself. It is so cute as well and really tasty. You can make strawberry lip balm, almond lip balm, chocolate lip balm, pineapple lip balm...it just depends on what you have. You can also make flower ones, but I'll go into that in a minute. So, what you will need is: 🌈Petroleum jelly; some people call it Vaseline 🌈Any essence; vanilla, strawberry, chocolate...the possibilities are endless! 🌈A sort of small container to keep you lip balm in 🌈Toothpick 🌈Spoon So, first you want to scoop some Vaseline in your container until it's full. Take your flavouring and add a few drops of it in the Vaseline; and then stir it with a toothpick or skewer; it depends on the amount of lip balm. When it is fully mixed in, smooth out the lip balm with the back of your sp...

DIY Key-chain - Tutorial

Image
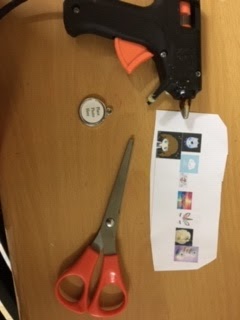
So, as you may or may not know, I have an obsession with DIY. There's something about having that feeling that you made it yourself - and it feels good . Anyway, I was bored, and I wanted a key-chain (it was on my wish-list). So, I decided to surf the internet for do-it-yourself key-chains. Most of them just weren't up to what I wanted, and for some, I didn't have the materials. I plan to make another one that I found on the internet later; it was a secret lip-balm macaroon key-chain and I think that is adorable . But I don't have any lip-balm at the moment, so I combined many different ideas on the internet and made my own original key-chain! ~DIY Key-Chain~ Your materials: 💌Hot glue gun 💌Clear hot glue stick 💌One of those metal orb pendants (I think that's what they're called?) 💌Scissors 💌Jump ring/ key-ring 💌A sheet of paper printed with some of your favorite pictures off the internet When you've got your materials, first you beg...

Ways to enhance your Ramadan

Hiya - I am so excited! In Saudi Arabia Ramadan is tomorrow, and today I am going on Taraweeh! So, I have been looking for ways to make this Ramadan really great, and I came up with a few tips. These include lots of ways to make your Ramadan special and unforgettable. 🌙⭐🌙⭐🌙⭐🌙⭐🌙⭐🌛🌙⭐🌙⭐🌙 TiP #1 Make your Ramadan more special by turning off all social media. Either delete it, disable it, or don't go back to it until Ramadan is finished. You can keep e-mail on and phone calls (yes, yes) but try not to go back to social media at all until Ramadan is finished. TiP #2 Ramadan is a time for devoted prayer. Don't just pray two rakah in the night and say that is your Taraweeh and/or Qiyam-ul-Layl. I usually pray eight rakah for Taraweeh, and at least four for Qiyam-ul-Layl. Also, try to read long surahs (chapters of the Quran). Don't just do this: repeat Al-Kauther, An-Naas, and Al-Asr every night (or any other short surahs). Ramadan is a time for extended prayer...

Tips On Organizing A Club

I'm having a lot of club-work these days, with organizing the people (seriously there are about 14 now), and planning the meetings and assigning jobs and other stuff. Because I'm so caught up, I decided to write a post that might help you all - I know it's fun to have a club, but of course it's good hard work too! If you don't have a club and would like to start one, that's fine too. These are  street-smart tips that are not learned from books, just from my own experience. I don't have a guarantee for you that this might work also, so change it if needed to suit YOU! Starting The Club -You first need to choose which kind of club you want. I'm more good at running casual clubs than the more specific kinds, so this might focus more on that, but on the whole, I'm not really sure! -Ask friends that you might want to be in your club. It's always best to choose close friends first, with expanding after you've laid the first planks. ...

My Latest Happenings!

I haven't posted recently for a long time, so, I decided to make this a bonus post. It just contains some stuff I've been up with and some book reviews, tutorials, and things. So, for the first part of this post, I'm going to tell you a book review or two. So here you go................... The Naughtiest Girl In School Author: Enid Blyton This is a funny book, about a girl, called Elizabeth. She doesn't want to go to school, and she decides to be as naughty as possible to get expelled. But this doesn't work, and slowly, as she becomes nicer, she begins to like the school, and then she makes up her mind to stay there. For the second part, I am going to tell you a tutorial. How to Make a Bracelet You will need Some small rubber bands or loom bands (I used loom bands for this project) A clip on charm or a bead First, make a 8 figure on two fingers. Easy way: Put a band on your finger. Stretch it, and twist it one time. Loop the other end on y...

Who Is Your Favorite Author?

I have posted a poll on my blog of who is your favorite author. If unable to cast your vote, please tell me in the comments down below: Enid Blyton J.K Rowling Jules Verne Other These are the choices you can vote from.

Some of the tricky origami models that I have made this week!

Image
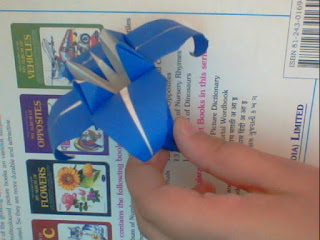
Here are some super tricky models. I am probably not going to teach you all of them! Here is a iris. This is one of the tricky models that I have mastered. Here is a traditional one, the crane. I made it for the first time.       Hoot, hoot! This owl model is of a medium difficulty level.

Origami Flower

Image
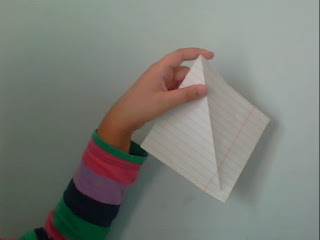
I love origami, and I love making tricky models. Here is one of the easiest but one of the prettiest model I have learned: the origami flower. You will need a square piece of paper. I am looking for the special origami paper that is already cut into a square beforehand. But, you can use A4 paper and cut it into a square. First, you fold the paper in half diagnolly: Next, you fold it the other way diagnolly: You fold the corners into the middle: Fold the corners into the middle. You have to repeat this 2 times. Now do a flap fold on each of the outer petals: Flap fold the inner petals as well: And your flower is done!

Paint

Sorry about not posting for a while. Anyway, I wanted to share with you something called Paint. Paint is a lovely art download that is pretty cool. It actually comes downloaded in most computers beforehand. You just click on Start and you will see Paint. Note: I have a DELL computer. I don't know if Paint is in other brands. Ok, now you know where to find Paint, lets get started with our tutorial! First, start by clicking on the Brushes. There are lots of different ones. If you want to make a shape, try using the shapes section. My favorite shape is the razor. After you have drawn your design, take the Fill button. It looks like a bucket of paint and some is spilling out. Choose your color, then color the background and your drawing. When you are done with your drawing, click to exit. It will ask you if you want to keep the drawing. If you want to, click Save. Paint is really fun!