Posts

200 posts!

Image
THIS IS THE 200TH POST. YIPPEEEEEEE!

I ❤️ Art

Image
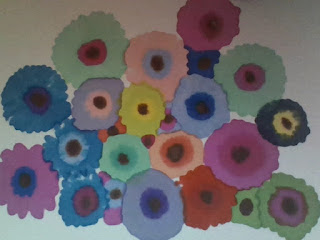
Today is another post, tomorrow is a wonderful day. Yes, I'm back with art, both traditional and digital. I've got the good ones, have the bad ones, and I'm having a wunnerful  day. Here's my first one. I never finished filling the page with flowers, but I think it's good enough to share. I have no idea if you think I'm lazy or not, though. x-D I have no idea why I wrote that. MY HANDWRITING IS TERRIBLE. I think the flowers are okay though. I bet you're wondering why I am obsessed with flowers at this point. Based on a quote I found somewhere. I don't know who said it though. (Coloring this was so time consuming.) This is one of the best drawings I've made, although some of the lines don't have good proportions. :'( A quick doodle which I decided to color in, and surprisingly the flowers and stems turned out good. The leaves are terrible, though. 😭 Digital! Yippee! I kinda shocked my mum with this, but I just m...

DIY Pearl bobby pins - Tutorial

So here we are with another DIY post! I absolutely love sharing all my DIY ideas. It's so fun! Anyways, today I'm doing pearl bobby pins. These are so easy, and so cute! I'm thinking of making animal bobby pins later, so let me know what you think in the comments! These pearl bobby pins are perfect for the weekend, as they add a touch of sparkle to a fancy outfit. Don't worry, you don't really need to only use pearl beads. You could use any other sparkly things, but I just think that pearls are simple and make more of a statement. This doesn't have pictures yet, but I will try to add them soon. Materials: 🍧Hot glue gun 🍧Bobby pins 🍧Pearl beads 🍧Hot glue stick So, first you'll have to heat your hot glue gun up. When it's ready to go, squirt a small  blob on the head of the bobby pin. Make sure the bobby pin is vertical, with the head up. If you do it horizontally, the glue will start dripping everywhere. Now put the pearl on. You have to be ...

DIY Charm - Tutorial

Image
Here's another DIY tutorial on a DIY charm! These charms are super cute and have so many possibilities! This is a super easy craft which doesn't require any special materials, doesn't require major expertise, and can easily be made by a 9-year-old! This easy simple double-sided heart charm that I made today set me rocking for fifteen minutes. I have it right beside me. (Just one more chicken nugget on the information platter). You will need: 💟A hot glue gun 💟A clear glue stick 💟Any coloring supplies; I used permanent markers but you don't have to 💟Paper (lots) 💟Scissors 💟A pencil/pen       breathe and believe in hot glue magic Okay, so, now what? Fold the paper in half and draw a shape (I chose a heart because it's simple) on it, like this: That's what it should look like. Cut it out. You should have two exact shapes. Now, get coloring! I used blue for one and pink for another, but you can make them both the same and choose ...

DIY Lip Balm - Tutorial

Aaaaand I'm back with another DIY post...this one doesn't have pictures but it is pretty straightforward. This is DIY lip balm and it is soooooo  easy! It literally requires two ingredients for the lip balm itself. It is so cute as well and really tasty. You can make strawberry lip balm, almond lip balm, chocolate lip balm, pineapple lip balm...it just depends on what you have. You can also make flower ones, but I'll go into that in a minute. So, what you will need is: 🌈Petroleum jelly; some people call it Vaseline 🌈Any essence; vanilla, strawberry, chocolate...the possibilities are endless! 🌈A sort of small container to keep you lip balm in 🌈Toothpick 🌈Spoon So, first you want to scoop some Vaseline in your container until it's full. Take your flavouring and add a few drops of it in the Vaseline; and then stir it with a toothpick or skewer; it depends on the amount of lip balm. When it is fully mixed in, smooth out the lip balm with the back of your sp...

DIY Key-chain - Tutorial

Image
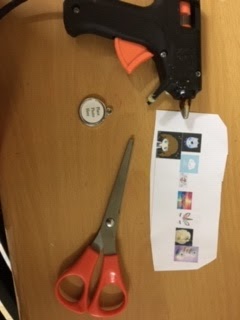
So, as you may or may not know, I have an obsession with DIY. There's something about having that feeling that you made it yourself - and it feels good . Anyway, I was bored, and I wanted a key-chain (it was on my wish-list). So, I decided to surf the internet for do-it-yourself key-chains. Most of them just weren't up to what I wanted, and for some, I didn't have the materials. I plan to make another one that I found on the internet later; it was a secret lip-balm macaroon key-chain and I think that is adorable . But I don't have any lip-balm at the moment, so I combined many different ideas on the internet and made my own original key-chain! ~DIY Key-Chain~ Your materials: 💌Hot glue gun 💌Clear hot glue stick 💌One of those metal orb pendants (I think that's what they're called?) 💌Scissors 💌Jump ring/ key-ring 💌A sheet of paper printed with some of your favorite pictures off the internet When you've got your materials, first you beg...

Dumbo - A movie review

Image
 I watched Dumbo on Wednesday, I think? Not in the cinema, but at home. (I freak out in cinemas; I can only stand G-rated movies there). This one, though, was PG, and because I was having my exams I wasn't going to learn Quran for a week. So, when my younger brother was gone, I calmly watched Dumbo right before my science exam. I should say beforehand that this review might contain minor spoilers - I'll try to not give away how it ends, because the ending is mixed - sad but happy. Dumbo is a really sad movie. Honestly, though, most of the tears you might weep are going to be happy.                                                           My rating:  4.9 star   A tale of a key, a feather, and family. Dumbo is a movie that takes your emotions and plays with them, resulting in an eye-candy masterpiece which enlighte...